![]()
![]()
![]()
![]()


|
|
|
|
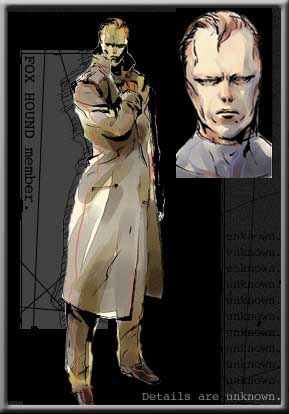
An elite group of Next Generation Special
Forces lead by members of FOX HOUND has attacked and captured an Alaskan nuclear
weapons facility. Their demands state that the US government
hand over the remains of their former commander (Big Boss) within 24 hours or
they will launch a nuclear weapon. Solid Snake’s mission comes in a two
phases. First, he needs to rescue both DARPA Chief Donald Anderson and the
President of Arms Tech Kenneth Baker, both are being held captive in the
facility. Next, Snake needs to investigate weather or
not the terrorists have the ability to actually launch a nuclear weapon, and
stop them if they do. Weapons and Equipment
When Solid Snake is launched via torpedo into
the Alaskan base, all he has on him is a pack of cigarettes and a scope. Being
the resourceful tough guy that he is, Snake will find various weapons and items
throughout the game that will help him save the world once again. Weapons:
Socom: FA-MAS: Nikita: Stinger: PSG1: Grenade: Chaff Grenade: Stun Grenade: The
Stun Grenades can be used to knock an enemy to the ground for a short period of
time. C-4: Claymore: Similar
to C-4, these are mines that can only be placed on the ground. Instead of Snake
detonating them, they explode when someone gets near.
Items:
Cigarettes: Rations: Scope: Thermal Goggles: Gas Mask Cardboard Box: Medicine: Your
standard cold cure. Diazepam: Socom Suppressor: Silences
the Socom. MO Disc: Just
a prop for the story mostly, the disc does nothing special in game.
PAL Disc: This
disc becomes the key to stopping Metal Gear later in the game.
Key Disc: Night Vision Goggles: Mine Detector: This
object shows Snake where mines are in the area.
Camera: When
you play through the game a second time, you will be able to use this Camera to
take pictures of things. Rope: Snake uses this to repel down a wall at a certain point during the game.
Ketchup: Otacon
brings this to Snake, and it can be used to fool a certain guard…
Handkerchief: Once
belonging to Sniper Wolf, this cloth will make the wolves like Snake.
Special Items:
Bandanna: Beat
the game with the good ending to receive this item. It gives you infinite ammo.
In
addition to learning the basics of the game interface, you also need to learn
how to play the game successfully. Within the game itself is an extensive VR
Training course that takes you through every aspect of the gameplay. It is highly recommended to
play through the training missions. Not only will it teach you what to do and
what not to do, it will also make you a better player and fully prepared for the
main adventure. If the normal training was not enough, there
is a whole set of VR Missions to play through. When Metal Gear Solid Integral was
released in Japan, it included a third disc of special VR Missions. These were
eventually released as a separate game in the US titled called Metal Gear
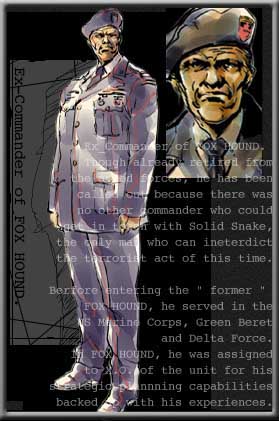
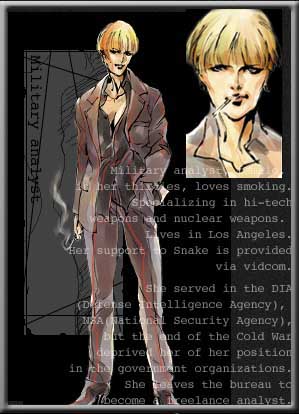
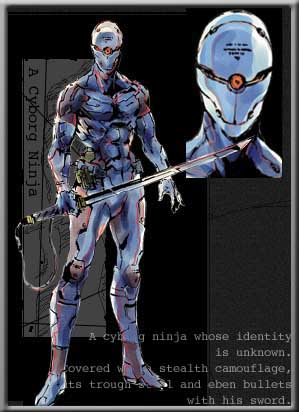
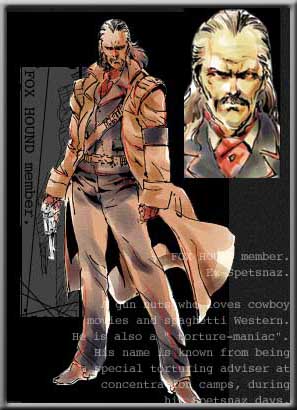
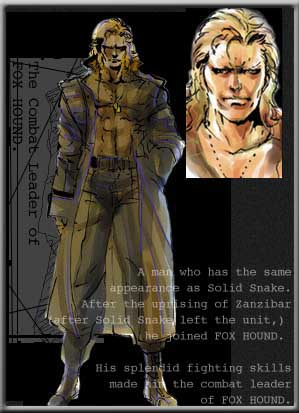
Solid: VR Missions. Characters
Metal Gear Solid features a large cast of
characters, each with their own histories and motives. The truth about most of
these characters is revealed throughout the course of the game, but you can find
some spoiler-free details about them (as well as their Codec # - if there is
one) below:
Walkthrough
The story of Metal Gear Solid is split across
two discs. This walkthrough will provide you with complete strategies to survive
and complete any version (US, Japanese, or PC) of this classic game. You can
find the walkthrough broken into sections below:
Note: All
screenshots in this guide were taken using the PC version of Metal
Gear Solid (which is actually Metal Gear Solid: Integral).
Disc 1, Part 1
Area 1: Dock
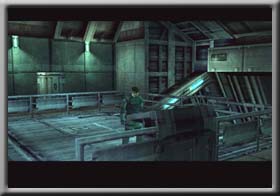
At the start of the game, Snake will emerge
from his scuba dive in the dock area. You will be near a large box-like
structure with no apparent way to get past it. Strangely, this is a part where
some people seem to have gotten stuck right off the bat, when in reality it is
pretty simple. All you need to do is crouch down and crawl under the pipe.
After the pipe, stop at the corner and press
yourself up against the wall, as there is a guard that patrols the area nearby.
Run to the right, while avoiding the puddle on the floor (it will alert the
guards) and run to the farthest box and wait. Use your radar to monitor the
movements of the two guards, and then wait until they are not looking in your
direction. Run to the middle "hall" between the boxes and run all the
way to the left until you reach the farthest wall. Then run towards the top of
the room, at which point you will receive a call from Campbell who will inform
you of the elevator. Run over to the upper right hand corner of the room to find
a ration behind the forklift, and then wait for the elevator.
As soon as the elevator arrives, wait for the
guard to exit it and move away from it, then run aboard to view the title
credits and enter the next area. Area 2: Heliport
As soon as you enter the area, Snake will
witness a Hind-D taking off. After that, you will receive a Codec transmission
from Campbell where you will be briefed and introduced to Mei Ling, who can save
you game by contacting her on frequency #140.96. She will also explain to you
how your radar works, before handing you off to Naomi Hunter and Campbell. You need to enter the base, but the front
door is too heavily guarded. To get in, you need to make your way to the small
air duct on the left side of the building. Run to the right, and slither your
way along the air conditioner boxes to find another ration. Be careful here, as
there is one guard patrolling the area.
Up near the last box, is a security camera
that will alert the guards if it spots you. Quickly run to the truck, jump
inside and you can find your Socom hidden behind a box. You are now able to bust
a cap in any guard who happens to notice you. Run up near to front door, and
slide along the wall until Snake notices the surveillance camera. There is a
guard snoozing in front of the vent, but crouch down and crawl inside to access
the Tank Hanger. Area 3: Tank Hanger
While crawling through the dark and dank
tunnel, Snake will receive a call from Master Miller (Codec: 141.80). He and
Snake will chatter for a while, and you will then be able to continue on your
crawl through the tunnel.
You need to be very careful when you reach
the end, as your radar does not work inside the confined space, and there are
two guards in the room that you need to enter. Wait until you see a guard pass
by the vent, and then exit and run to the bottom part of the room. Campbell will
call and tell you about the elevator, but ignore that for now, as you need to
get one crucial item from this area. Walk along the bottom part of the room until
you come to the left side. Slither along the wall and wait until the guards pass
out of range. Then run up the stairs, and wait for the camera to move out of the
way so your can get by. You need to slide yourself along the wall while waiting
for it to move in the two directions.
Run along the catwalk to the right side of
the room. Enter the small closet and run to the back of the room (careful, there
is a camera here) to find the Thermal Goggles. These will be extremely useful
very soon.
Return to the main floor (while avoiding the
camera and guards on the way), and push the button. It takes a minute or two for
the elevator to arrive, so quickly skirt over to the area under the stairs to
find some Socom bullets, and a nice corner to hide until the elevator arrives.
Get inside it, and press button B1 to go down to the Cell.
Area 4: Cell
When you enter the Cell, Mei Ling will
contact you to say that the DARPA chief is showing up on your radar.
Unfortunately he is locked away in a cell, and you can see no easy way to get
him out. Thankfully, you are Solid Snake and that means there is nothing you
cannot do. Run down the hallway and turn at the end of it to find a ladder.
Campbell will call you and tech you how to climb it, so do that and enter more
air ducts. Down the first left tunnel in the ducts, you
will find some Socom bullets, as well as a grate where you can spy on a guard
while he is sitting on the toilet (why you would want to do this is you own
business…).
Continue down the shaft to the end, where it
turns once again to the left. The first vent shows you the first glimpse of
Meryl in the game, and the final vent will give you access to the cell holding
the DARPA Chief.
The chief will explain a lot to Snake,
including some details on Metal Gear Rex. Throughout their conversation, Meryl
will be listening in, and plotting her own escape. Toward the end of the scene,
the chief will have a sudden heart attack and drop dead. Thankfully, he gave
Snake his keycard as right before he died. Once you have control again, you will hear
some commotion outside, and you will also be able to find a ration under the bed
(if you need it). Exit the room to encounter a very nervous "guard".
After a short confrontation, an elite group of soldiers will burst in and open
fire on the two of you. Use your Socom to mow down the enemies, and pick up the
ammo and rations they drop as needed. When they toss three grenades into the
room, move up into the doorway to avoid the blunt of the blast.
Even though you have the Level 1 keycard, you
only able to open one of the doors in this area and it happens to be the one you
just left (however there is some ammo in there if you need it). Enter the
elevator and press B2 to go down one more level into the Armory.
Disc 1, Part 2
Level 5: Armory
This is the first time where those Thermal
Goggles will come in useful. There are tap doors down a couple of the halls
here, and they will kill Snake instantly if he steps on one. If you put on the
Thermal Goggles, you will be able to spot them before you step on them. Run to
the entrance of the top middle building, and use the Level 1 keycard to enter
it. Inside you will find two cases of C4, which you will use very shortly. The
lower middle building holds some Socom bullets, so grab them if you need ‘em.
There are three places in this area where you
can use the C4. To the right and left of the elevator are to blue-ish patches of
wall that bow away to reveal ammo (one has two trap doors in it – so use
Termals and be careful). The other area is the crucial one. In the lower left
hand corner of the room is a large blue patch of wall, planting C4 there will
give you access to Armory Sth. Area 6: Armory Sth In this area, you will need to use C4 two
more times. The first is on the right wall, and the second is on the top wall
once you go through the newly opened hole. Once you enter that last hole, you will find
Kenneth Baker tied up to enough C4 to level a small country. You will also meet
Revolver Ocelot, and have your first boss fight of the game.
This fight isn’t incredibly difficult
seeing as it is your first big battle, but it still requires a little strategy.
At the top of the screen you will see your life, Ocelot’s life and ammo count,
as well as Kenneth Baker’s life. You must KO Ocelot while protecting Baker
from any harm.
The way to fight Ocelot is to run around the
room in circles while taking one shot at a time at him when you have a clear
shot (more than one shot is a waste of ammo, as his is invincible for a few
seconds after getting hit once). Also, keep an eye on Ocelot’s ammo, when he
runs out he needs to reload, which leaves him vulnerable. If you run out of
ammo, three containers of bullets are located in the area to refill your stores.
When Ocelot is down, the Ninja will appear
and chop off his gun hand. After that, Baker will be freed and will give you
another keycard before dying just like the DARPA Chief did.
The door at the top of the room is still
locked to you, even with the Level 2 key, so return to the Armory, where you
will be able to access some new rooms. The lower left one holds grenades, which
you will want to snag to use in the next boss battle that is on the way very
soon. The lower right one holds the FA-MAS gun and ammo for it, but it is
guarded by two laser trip-wires. To get past these, put on your thermals, and
crawl under them. Exit that room, avoid the two new guards, and
enter the elevator. Return to the first floor, and run to the right-most wall,
and enter the door. At the end of this little room is a Socom Suppressor
(silencer) that is guarded by a snoozing guard. You can either use a Stun
Grenade or choke him from behind to grab it and then exit.
As Baker told you, there is a codec # on the
back of your CD case. The number is 140.15, and it puts you into contact with
Meryl. After a conversation, Meryl will say that she is able to open the cargo
bay door, which will give you access to a new area. While waiting, you can go
upstairs and finally enter the left door that you passed earlier to find the
famous Cardboard Box and some Chaff Grenades. Once the door is open, you need to use your
Thermal Goggles to pass by the laser beams. If you touch one, the gas will enter
the room and you will die. Wait until each beam is moving up before passing
under it, and then use the keycard to open the door at the end of the hall.
Area 7: Canyon
In the Canyon you can either use a mine
detector (if you found one) or your Thermal Goggles to locate the mines and
avoid them. Follow the left wall and about halfway through the area, you will
view a cut scene that introduces you to your next boss – Vulcan Raven.
This battle can be very annoying if you did
not pick up those Chaff Grenades earlier. From behind some cover, toss a Chaff
to scramble the tanks sensors so it cannot fire its cannon at you. Then run up
and start tossing normal grenades into the centre area of the tank. It should
only take four or five hits, and both soldiers inside will be killed and you
will gain the 3rd keycard. Area 8: Nuke Building From the entrance, run up the catwalk to the
left to find a ration (since you can now carry three at a time), then crawl
under the door at the top of the room. Inside there are guards to avoid, and you
cannot use weapons in this room due to the nukes scattered about.
Run along the bottom of the room to the left,
and climb up the stairs. There is a guard the patrols the catwalk near the
elevator, but you can crouch down in the middle of the staircase to avoid
detection by him and the guards on the lower level. When the coast is clear,
call the elevator and go down to floor B1.
Enter the room directly across from the
elevator and carefully watch the guard’s movements. Your goal in here is the
middle office on the right side of the room, where you will find the super fun
Nikita Missile Launcher and some ammo for the cool weapon.
Exit the room, and re-enter the elevator and
head to floor B2. This is where the Nikita comes into use. The room is filled
with gas, and the floor is electrified. You need to fire off a Nikita and
control it in first person mode to blow up the fuse box that you saw in the cut
scene. To do this, fire the missile, hit the first person key, and turn right at
the end of the hall. Guide it through the office, and through the two glass
doors. Turn right sharply and enter the small room, then turn left to find the
box and blow it up.
Once that is taken care off, you can walk
down the hall. The first door on the right has a ration inside, while the third
door has a very helpful gas mask guarded by a camera. Grab the gasmask, and then
take the right fork of the hall to enter the next area, and face the Ninja one
on one.
The Ninja fight is much more complicated than
your previous battles, as the Ninja has a couple different ways of attacking,
which are explained below:
When Ninja is defeated, Snake will meet
Otacon though a very long story sequence. Toward the end of it, Otacon will
offer Snake his assistance and will provide him with the Codec frequency to
reach him on (141.12) as well as the Level 4 card. Return to the elevator and go back to floor
B1. When you enter the room across from the elevator again, a guard will notice
you and immediately run out. Follow it into the room to the right of the
elevator to reveal that it is really Meryl. After a little chat, you will
receive the Level 5 card, which will give you access to a door at the end of the
hall. Disc 1, Part 3
Area 9: Commander Room
As you approach the door, Meryl will begin to
act strangely. The reason for this will be revealed as soon as you enter the
room at the end of the hall. Inside, you will encounter Psycho Mantis – FOX
HOUNDS resident psychokinetic bad dude. Of course, you must fight him and it becomes
one of the most unusual and unique boss confrontations in any video game –
console or PC. At the beginning of the fight, Meryl will be under Mantis’
control, and you must knock her out (but not kill her) in order to get to him.
Do this by throwing her instead of punching (or use a Stun Grenade), since she
won’t take that much damage.
Psycho Mantis can read YOUR mind, which means
that he can tell what button you are about to press on your controller, thus he
is able to react perfectly and your weapons are useless. The way to get around
this is plug a second controller into the system and use that one to fight him
once the words "HIDEO" appear on the screen.
When Mantis throws objects around the room,
drop to your belly and wait until the sky is clear. Then jump up and pelt him
with bullets from your FA-MAS. After a few rounds of this, he will once again
take control of Meryl, and again you must KO her to continue. Immediately after
you KO her, he will take control of her again and place her gun against her
head. You’ll have to KO her VERY fast or else he will force her to kill
herself. After that, you simply have to continue blasting him when you have a
clear shot.
PC Strategy: Since
Psycho Mantis required a very PlayStation-specific tactic to defeat in the
console version; the battle will naturally be different in the PC. When the
battle starts, switch over to using the keyboard (or gamepad if you are already
using the keyboard) to defeat him. Once Mantis is out of the picture, Snake and
Meryl will travel together for a while. In the next area, you will need to
travel through a short cave full of Wolf Dogs. They don’t really like Snake
much, so use your Thermal Goggles to find your way through the cave quickly at
which point you will arrive at the Underground Passage.
Area 10: Underground Passage
When you enter this area, Meryl will say how
she knows that it is mined. Follow her footprints to safely pass the dangerous
explosives that are hidden under the concrete.
After that short little scene, Meryl will be
shot down by a sniper, the long distance sharpshooter of FOX HOUND – Sniper
Wolf. Unfortunately, Snake does not have a sniper rifle of his own, but you can
easily find one. All you need to do is run all the way back to the Armory and
take one from there. Once you have the PSG-1, return to where
Meryl was shot to find her missing, but Sniper Wolf is still there waiting for
you. Run over to either upper corner of the small square area and arm your
rifle. To steady your shot, use Diazepan, and aim carefully. You can actually
get two or three hits into her before she will move on. If you happen to run out
of ammo, you can find more on each side of the small area you are in.
Even though you have depleted Sniper Wolf’s
life bar, she is not done with you yet. Run forward, and climb up to where she
was shooting at you to find some PSG-1 ammo, and then run to the door in the
corner of the area. As soon as you approach it, guards will arrive with Sniper
Wolf to take you captive. When you awake you will find yourself
strapped to an electo-torture device manned by none other than Revolver Ocelot.
It appears as if he is still holding a grudge for your little skirmish earlier
in the mission, and he wants to take it out of your hide.
This torture sequence is a turning point in
the game. If Snake survives it, you will go on to view the "good"
ending when you complete the game. If Snake gives up, the "bad" ending
will be shown. Finally if Snake dies, it is GAME OVER with no option to
continue.
To survive the torture, you must rapidly tap
the CIRCLE (O) button over and over. The easiest way to do this will vary from
person to person, but one way is to brace the controller against something like
a controller and pound the button using your index or middle finger. Also, you
cannot cheat by using a Turbo Controller; the game will know and will instantly
fail you. Once the torture is complete, Snake will find
himself in a cell, and you need to escape. While waiting in the cell, you make
be taken for more torture sessions depending on what difficulty you are playing
the game on. To escape from the cell, you can do two
different things. The first is to call Otacon, who will come and give you a
bottle of ketchup and a scarf. When the guard runs to the bathroom, use the
ketchup, and Snake will lie on the ground and appear to be dead. The guard will
come back, open the door, and Snake will be able to KO him and leave. This
tactic affects events later in the game, so the second on is recommended.
That tactic is to again call Otacon (for the
scarf as it will be useful later in the game), and once again wait until the
guard runs to the bathroom. Then, hide under the bed until he comes back. Once
again, the guard will return and open the door, allowing snake to leave.
You can find your items in a box next to the
torture machine, then exit out of the right door to find yourself in the Cell
area from earlier in the game. Board the elevator and make your way back to
where you fought Sniper Wolf. When you are in the middle of the field where you
battled Vulcan Raven’s M1 tank, Deepthroat will call you and tell you that
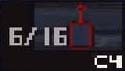
there is a bomb in your items. Scroll through your items (not weapons), until
you see an item with a number on it (it should be between 45 and 60). Press the
O button to use it, and Snake will toss it away. Continue onto the Sniper Wolf tower, and
enter the door where you were captured earlier to arrive in the Communications
Tower. Area 11: Communications Tower
You have now reached the point in the game
where events start to really speed up and become much more exciting. The tower
run is one of the fastest paced sequences in the game, and is very cool.
As Snake enters one of the outer rooms of the
tower, a camera right above the doorway will spot him, and alert the guards (you
will also find a Rope and Stun Grenades here – grab both). Unfortunately,
Snake has nowhere to run and hide, so he cannot evade them, and thus he must
fight. If you want bloodshed, equip your FA-MAS and fire while you run. On the
other hand, you can avoid a lot of battle if you just use Stun Grenades. When
you reach the first doorway, Otacon will tell you that it cannot be opened, but
you can still reach the other tower via the roof, so continue your way up.
When you finally reach the roof, Liquid Snake
appears in the Hind-D that you saw earlier in the game. After blowing up the
walkway to the other tower, he taunts Snake for a while before Snake realizes
that the only way off is to repel down the tower using the rope that you found
at the bottom. You need to repel down the side of the tower,
while avoiding Liquid’s gunfire as well as the hot steam. When you reach the
bottom, you will be at the door that you could not open earlier. On the walkway
ahead of you are three TOUGH guards that you cannot see in the darkness – so
do not run ahead just yet.
Pull out your PSG-1 and drop to the ground.
Snipe and kill all three guards before running down the walkway, or else you
will be in for a world of hurt. Once they are taken care of, continue forward
and Liquid will appear again to taunt you. Dodge the fire from his cannons and
run into the door to the left, where you will find the Stinger Missile launcher.
Once again you will need to run up more
stairs to the top of another tower. This time, you won’t have to deal with
guards, but rather cannons. About every other corner have cannons that will
shoot you. The first has one; the second has two, and so on. The easiest way to
get past these is to toss a chaff grenade as you come to each corner.
When you reach the top, exit onto the roof to
battle Liquid Snake in his helicopter. Arm the Stinger and get ready for his
attack. Liquid’s main attack is the cannon on his Hind-D, but you can avoid
the fire by hiding behind either the small building or crates on the roof. In
between attacks, fire off a Missile whenever you get a lock on. After a few
hits, Liquid will fire off a missile of his own, which will strike in the lower
section of the map. Once again, continue to pummel him with Stingers, and he
will eventually run low on life. When he fires off a second missile, you will
know that he is dead. After the battle, Otacon will call you on the
codec telling you that the elevator in the tower is once again working. Go back
inside and run down the stairs (while using Chaff Grenades to disable the
turrets), until you get to the elevator.
Once inside the elevator, Otacon will call
Snake on the codec. They will both realize that the lift is too heavy, which
means that Snake has some company in there with him. This will be a short battle
against four enemies using Stealth Camouflage. You can use Thermal Goggles to
spot them if you need to, but they are actually pretty easy to spot, as
they will be moving quite a bit. Use your FA-Mas to mow them down, and Snake
will exit on the ground floor. As you run through the last couple tunnels,
be sure to use Chaff Grenades, as there are turrets in a couple corners. Area 12: Snowfield
The next area you will arrive in will be the
Snowfield, and it is also the final area of disc one. As soon as Snake enters
the area, you will see him knocked to the ground through the scope of a sniper
rifle. Once again, you will have to face off against Sniper Wolf in armed
combat, and this time you must make sure you end it once and for all.
Instead of using the PSG-1 against the
sniper, run over to the far right corner of the area. From here, you will be
safe as you are behind a hill and she cannot hit you. Arm the Nikita Launcher,
and guide missiles to her one at a time until she is dead. With Wolf down, Otacon will come out and
there will be a little cinema scene and then you will have control of Snake once
again. Enter the door to the north, avoid the turrets, and run down the stairs
to end disc one. Disc 2
Area 1: Blast Furnace
A super-heated metal refinery greets Snake as
you begin disc two of the mission. Inside you will find that you are unable to
reach the stairway on the other side of the room due to a large metal object
blocking the ledge on the left wall that you need to inch along.
First, take out the guard on your side of the
room by any means necessary. Then, arm either the Nikita or Stinger launcher and
fire off two missiles to take out the metal bar that block your path. Finally,
inch your way along the left wall ledge to reach the staircase on the far side
of the room. Once down the stairs, you can either enter
the north door to access the next area, or explore the small doorway to the
south to find the Body Armour.
Through the north door, you will enter the
Cargo Elevator, which are actually two different elevators that you will need to
ride to reach the next objective. On the first one, three guards will jump on
and fight Snake. Deal with them the same way your fought the cloaked enemies in
the tower elevator, and then wait for the trip to finish.
At the bottom, be very careful of the turret
in the doorway, and then run to your right to get on the second elevator, and
make your way down to the next area. Area 2: Warehouse
The frozen area of the warehouse is where you
will face off against the final boss before the ending confrontation. Vulcan
Raven has returned to terrorize Snake, only this time he will be armed with a
very painful chaingun. To defeat this walking tank, use either
Stinger or Nikita missiles to hit him as he runs down the halls or is coming
into view from the other side of a box (see images). Use the boxes for cover,
and then pick up any items that fall as he blows up the boxes.
With Raven down, he will give you the key
that you need to access the final area of the game.
Area 3: Underground Base As you run down the entry hall to the
Underground Base, be sure to avoid two trap doors in the centre of the halls.
After that, the walls will be lined with many, many turrets. Toss a Chaff
Grenade to knock them out, and then run through the door to the north.
When Snake enters that door, he will get his
first glimpse of the impressive Metal Gear Rex. You need to use the ladders (the
first one is to your right as you enter the area) to climb up and over the
walking nuclear missile launcher, and reach the control room where you will be
able to use the PAL codes to disarm the missiles. Upon approaching the control room, a cinema
scene will be triggered where Snake will spy on Liquid Snake and Revolver Ocelot
conversing. When Snake is spotted by one of the cameras, the PAL disc will be
knocked out of his hands, and into the water below.
Avoid or kill the guards that will be alerted
when he is spotted, and return down to the bottom of the room. The PAL disc is
in a random location in the stream. Also, the water will damage Snake, so you
don’t want to be in it too long. In addition to that, there is a chance that
Snake will pick up another timed bomb while running around the water, which you
will need to dispose of the same way you handled the last bomb. Another thing that can happen to the PAL disc
is that a rat may pick it up. If that happens, you will need to kill the rat to
get the disc back. Once it is back in your possession, return to
the control room and use it on the first computer. After Snake does that, he
will find out that he will need to cool the key before using it on the second
computer. If you remember, the last cold place you were at was the Warehouse so
you need to run all the way back there to cool the key. When you enter the room,
equip the key and wait until it turns blue in the item description screen before
returning to the control room.
In order to use the key on the final
computer, Snake needs to warm it. Return to the Blast Furnace and equip the key
until it turns red in the item description screen.
Before you use the third key make sure you
are prepared for the final battle. The most important two things are:
As soon as you use the key on the final
computer, a cinema scene will start where Snake confronts Liquid Snake. From
that confrontation, Snake will be tossed directly into the battle against Metal
Gear Rex. This battle comes in two halves, split in the middle by a very
surprising revelation from one of the most popular characters in the game. For the first part of the battle, your target
is the small round radar dish on Metal Gear’s left shoulder. Equip your
Stinger missiles and fire whenever you have a clear shot (sometimes you will be
able to fire off two missiles before he moves). When Rex starts launching
missiles at you, do not run away. Rather, run towards the space between the
mech’s legs. The missiles will not strike there, so you will be able to avoid
them 85% of the time. Also, you can use Chaff Grenades to confuse the radar on
the mech, and cause the missiles to miss you. Next, he will begin to fire
machine guns at you. When that happens, run away from the mech (because he will
try to follow that up by stepping on Snake).
Once you have depleted its life once, a
cut-scene will begin with a very cool "save the day" scene from one of
the more popular characters in the game. When combat begins again, use the same
tactics to avoid damage as before, but this time fire your Stinger Missiles at
the mech’s face. After you defeat Metal Gear Rex, you will
have to fight Liquid Snake one-on-one using your bare hands, and no rations.
Both of you will have the same amount of health, so the fight is pretty even.
Tapping the attack button three times will get you a punch-punch-kick move when
attacking, so use that in a hit and run fashion until he is dead.
This is where a major spoiler comes in. What
happens now depends on weather you submitted or survived the torture sequence,
and since it is SPOILER material, you can find the answers in the Secrets
Section of this walkthrough! If you submitted during the
torture: Meryl will die and Snake will escape the complex with Otacon.
If you survived the torture
sequence: Meryl will live then she and Snake will escape the complex together.
Even though you just fought Liquid Snake, you
still aren’t through yet. Your escape companion will jump into a Jeep, and
Snake will take control of the cannon on the rear. You need to blow away all the
enemies, and blast a hole in the grating to continue.
After the two escapees blow away two
barricades, Liquid Snake will arrive in his own jeep and begin firing at you.
Keep shooting him until his car swerves in front of yours, and you will have
completed the game. Now, sit back and enjoy the ending, and be
sure to sit all the way through the credits for a cool little surprise at the
end. Secrets
Metal Gear Solid is packed full of secrets,
which you can find some detailed below:
For more tricks and secrets, be sure
to check out IGN Codes' Metal Gear Solid section. Get the Bandanna Get the Stealth Suit Snake in a Tux
Play as the Ninja
Unlock Mei Ling Photo Shoot
Change Title Screen Colours Different Workouts for Meryl Extra Modes in VR Training Hidden Ghosts Extras
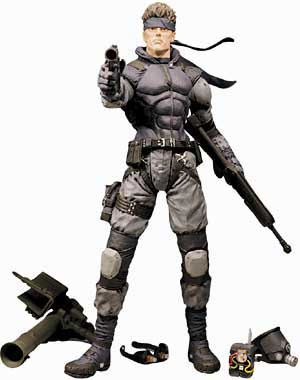
Shortly after the US release of Metal Gear
Solid, McFarlane Toys released a small line of action figures based on the game.
The set included Snake and Meryl, as well as the major players of FOX HOUND.
After first run quickly sold out, some variants were released such as
transparent versions of the Ninja and Psycho Mantis as well as a two-pack
including both Snake and Meryl in a collectible casing. This on is of Snake; there is also Meryl,
the Ninja, Revolver Ocelot, Psycho Mantis, Sniper Wolf, Vulcan Raven and Liquid
Snake. The pic of the figure is on
the next page.
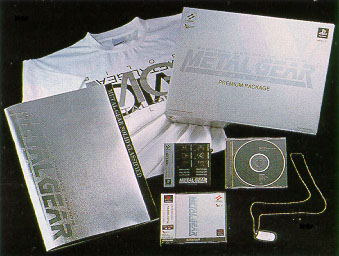
That is the Limited Edition
boxed set for Metal Gear Solid that was released along side the import version
of the game in 1998. Inside the cool silver box, gamers found a
FOX HOUND dog tag, a metallic memory card sticker, a history and art of Metal
Gear book, a T-shirt, soundtrack, and of course the game.
With the coolness that was the box set, one
can hardly imagine what they plan to do for the import release of Metal
Gear Solid 2: Sons of Liberty.
|
|
Send mail to [email protected] with
questions or comments about this web site.
|


